
초음파 센서제어와 웹 연동
1. 초음파 센서 구성
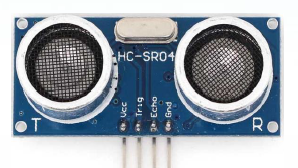
왼쪽 부터 차례대로
5V, Trig, Echo, Gnd 입니다.
2. 초음파 센서(거리측정) 코드 예시
부품 구성
5V : 물리적 2번
GND : 물리적 6번
Trig : 29(물리적 40번)
ECHO : 28(물리적 38번)
소스 코드
const gpio = require('node-wiring-pi');
const TRIG = 29;
const ECHO = 28;

var startTime; // 초음파 송출 시간
var travelTime;	// 초음파수신까지 경과시간


const Triggering = () =>{

        gpio.digitalWrite(TRIG,gpio.LOW);
        gpio.delayMicroseconds(2);
        gpio.digitalWrite(TRIG,gpio.HIGH);
        gpio.delayMicroseconds(20);
        gpio.digitalWrite(TRIG,gpio.LOW);

        while(gpio.digitalRead(ECHO)==gpio.LOW);
        startTime = gpio.micros();
        while(gpio.digitalRead(ECHO)==gpio.HIGH);

        // 초음파 거리를 구할때 공식과 같은것 입니다.
        travelTime = gpio.micros() - satrtTime;
        distance = travelTime / 58;
        if(distance < 400)
            console.log("Distance : %dcm\n", distance);

        setTimeout(Triggering,500);
    }

process.on('SIGINT',()=>{
    console.log("Program Exit...");
    process.exit();
});

gpio.wiringPiSetup();
gpio.pinMode(TRIG,gpio.OUTPUT);
gpio.pinMode(ECHO,gpio.INPUT);
setImmediate(Triggering);
3. 웹서버 프로그래밍 기술
웹 소켓을 이용한 웹제어
먼저 시작하기전에 $npm install socket.io를 통해 웹소켓을 설치합니다
이것으로 웹을 실시간으로 제어할 수 있고, 실시간 데이터 전송도 가능합니다.
웹을 제어하기 위한 js코드
먼저 TRIG와 ECHO는 앞에와 마찬가지로 wpi번호 29, 28을 설정하고 LED는 27번을 하겠습니다.
const http = require('http');
const gpio = require('node-wiring-pi');
const fs = require('socket.io');
const LED = 27;
const TRIG = 29, ECHO = 28;
var startTime, travelTime;	// 초음파 거리 계산용
var index=0, value = []; // 측정거리데이터 저장용
var timerid, timeout=800	// 타이머 제어용

const server = http.createServer((request, response)=>{
    fs.readFile('views/web_so.html','utf8',(error,data)=>{
        response.writeHead(200,{'Content-Type':'text/html'});
        response.end(data);
        });	//end of readFile
    }).listen(65001,()=>{		//end of createServer
        gpio.wiringPiSetup();
        gpio.pinMode(LED,gpio.OUTPUT);
        gpio.pinMode(TRIG,gpio.OUTPUT);
        gpio.pinMode(ECHO,gpio.INPUT);
        gpio.digitalWrite(LED,0);	// LED초기화 과정
        console.log("Server running at http://IP주소:65001");
    });		//end of listen

const io = socket.listen(server);
io.sockets.on('connection',function(socket){
    socket.on('startmsg',function(data){
        console.log('가동메시지 수신(측정주기:%d)!',data);
        timeout = data;
        watchon();	// 타이머가동(초음파가동)
    });	// end of socket.on

    socket.on('stopmsg',function(data){
        console.log('중지메시지 수신!');
        clearTimeout(timeid);
    });	// end of socket.on
});	// end of io.sockets.on

const watchon = () =>{
    gpio.digitalWrite(TRIG,gpio.LOW);
    gpio.delayMicroseconds(2);
    gpio.digitalWrite(TRIG,gpio.HIGH);
    gpio.delayMicroseconds(20);
    gpio.digitalWrite(TRIG,gpio.LOW);

    while(gpio.digitalRead(ECHO)==gpio.LOW);
    startTime = gpio.micros();
    while(gpio.digitalRead(ECHO)==gpio.HIGH);
    travelTime = gpio.micros()-staartTime;

    distance = travelTime / 58;
    if(distance < 400){
        if(index < 500){
            value[index++]=distance;
            console.log('근접거리:%d cm',value[index-1]);
            io.sockets.emit('watch',value[index-1]);
            }
            else index = 0;
            if((index % 2)==0)gpio.digitalWrite(LED,1);	// 가동중 LED 점멸
            else gpio.digitalWrite(LED,0);
        }
        timerid = setTimeout(watchon, timeout);
    }
웹 코드(web_so.html)
<!DOCTYPE html>
<html>
<head>
    <meta charset = 'utf-8'>
    <script src = "/socket.io/socket.io.js"></script>
    <script>
    window.onload = ()=>{
        var dataview = document.getElementById("dataview");
        var socket = io.connect();
        var html= '';

        socket.on('watch',function(data){
            html += '<b>' + data + '</b>' + '<br>';
            dataview.innerHTML = html;
        });
    // 문서 객체 이벤트 연결
    document.getElementById('start').onclick = function(){
        var text = document.getElementById('text').value;
        socket.emit('startmsg',text);
    };
    document.getElementById('stop').onclick = function(){
        var text = document.getElementById('text').value;
        socket.emit('stopmsg',text);
    };
};
</script>
</head>

<body bgcolor = "lightcyan">
    <h2>거리측정제어(초음파센서제어)</h2>
    <hr>
    <h3>측정주기 설정 및 가동 </h3>
    <hr>
    <input type = "text" id="text" value="800" />ms
    <input type = "button" id="start" vaule="초음파센서가동"/>
    <input type = "button" id="stop" value="초음파센서중지"/>
    <hr>
    <p id = "dataview">초음파센서가동시 이곳에 측정거리값이 출력됩니다. </p>
</body>
</html>
※ 만약 선형 그래프를 그리고 싶으면 아래와 같은 코드를 사용하면 됩니다.
plotly.html (위에서 연결하는 코드만 바꾸면 됩니다)
<!DOCTYPE html>
<html lang="en">
<head>
    <meta charset="UTF-8">
    <meta name="viewport" content="width=device-width, initial-scale=1.0">
    <meta http-equiv="X-UA-Compatible" content="ie=edge">
    <meta http-equiv="content-type" content="text/html; charset=UTF-8"/>
    <script src="https://cdn.plot.ly/plotly-latest.min.js"></script>
    <script src = "/socket.io/socket.io.js"></script>
    <link rel="stylesheet" href="https://stackpath.bootstrapcdn.com/bootstrap/4.3.1/css/bootstrap.min.css" integrity="sha384-ggOyR0iXCbMQv3Xipma34MD+dH/1fQ784/j6cY/iJTQUOhcWr7x9JvoRxT2MZw1T" crossorigin="anonymous">
    <script src="https://code.jquery.com/jquery-3.3.1.slim.min.js" integrity="sha384-q8i/X+965DzO0rT7abK41JStQIAqVgRVzpbzo5smXKp4YfRvH+8abtTE1Pi6jizo" crossorigin="anonymous"></script>
<script src="https://cdnjs.cloudflare.com/ajax/libs/popper.js/1.14.7/umd/popper.min.js" integrity="sha384-UO2eT0CpHqdSJQ6hJty5KVphtPhzWj9WO1clHTMGa3JDZwrnQq4sF86dIHNDz0W1" crossorigin="anonymous"></script>
<script src="https://stackpath.bootstrapcdn.com/bootstrap/4.3.1/js/bootstrap.min.js" integrity="sha384-JjSmVgyd0p3pXB1rRibZUAYoIIy6OrQ6VrjIEaFf/nJGzIxFDsf4x0xIM+B07jRM" crossorigin="anonymous"></script>
    <script>
    window.onload = function(){
        var dataview = document.getElementById("dataview");
        var socket = io.connect();


        socket.on('watch',function(sonicdata){  // 초음파데이터 실시간수신
            Plotly.extendTraces('chart',{y:[[sonicdata]]},[0]); //차트에 그리기
            widthcount++;   // 그래프데이터 카운트
            if(widthcount>100){ // 100이상부터 차트 동적이동
                Plotly.relayout('chart',{
                    xaxis:{
                        range:[widthcount-99,widthcount]    // x축 동적이동
                    }
                });
            }
        });
        document.getElementById('start').onclick = function(){
            var text = document.getElementById('text').value;
            socket.emit('startmsg',text);
        };
        document.getElementById('stop').onclick = function(){
            var text = document.getElementById('text').value;
            socket.emit('stopmsg',text);
        };
    };
    </script>
    <style>
        *{
            color:#6382ff;
            font-weight: bold;

        }
    </style>

    <title>초음파 센서 제어</title>
</head>

<body style="background-color: black;">
    <div class="container">
    <h2>거리측정제어(초음파센서제어)</h2>
    <hr>
    <h3>측정주기 설정 및 가동</h3>
    <h5>측정주기 입력 범위: 500~1000(단위:ms) 입력 값으로 조정 가능</h5>
    <hr>
    <input type="text" id="text" value="800"/>ms
    <input type="button" id="start" class="btn btn-outline-primary" value="초음파센서가동"/>
    <input type="button" id="stop" class="btn btn-outline-danger" value="초음파센서중지"/>
    <br><br><br>
    <div id="chart" class="container bg-dark shadow mx-auto">
        <script>
        Plotly.plot('chart',[{
            y:[0],  // 출력값 지정
            type:'line',    // 선차트 지정
            line:{shape:'spline'}   // 곡선형태 지정
        }]);
        </script>
    </div>
    <hr>
    <!-- <p id="dataview">초음파센서가동시 이곳에 측정거리값이 출력됩니다.</p> -->
</div>
</body>
</html>
'Coding > Raspberry pi - node.js' 카테고리의 다른 글
| 웹기반 조이스틱 제어 (0) | 2019.11.17 |
|---|---|
| SPI 방식과 ADC 칩 (0) | 2019.11.16 |
| 실습 - PWM을 이용한 LED 밝기 제어 (0) | 2019.10.09 |
| WiringPi GPIO API인 PWM이용하기 (0) | 2019.10.09 |
| 인터럽트 방식으로 버튼 제어하기 (0) | 2019.10.09 |


댓글